Print Ready Files and Art File Preparation for Printing, Promotional Products and Advertising
FORMER

- Holiday Cards

- Wedding Invitation

- Play Golf Game Online

-
Printing
Business Card Printing Postcard Printing Plastic Cards Printing Magnets Printing Carbon Forms Printing Flyers Printing Presentation Folders Printing Labels & Stickers Printing Brochure Printing Letterhead & Envelope Printing -
Promotional Products
By Industry By Month / Season By Program By Professional Event By Awarenes -
Website Design

Web Templates Custom Designs E-Commerce Website Dynamic Websites Static Websites Website SEO -
Mailing
Consumer Lists Occupant Lists Business Lists Specialty Lists Addressing Folding & Perforating Personalization Tabbing & Inserting Data Enhancement Sending -
Graphic Design

Logo Design Business Card Design Postcard Design Brochure Design Folder Design Letterhead & Envelope Design Posters Design Banner Design Many More...
FAQ
- Setting up a File
- Q. What type of files can I use to submit my artwork?
A. Please save as a .jpg, .jpeg, .tif, .tiff, .psd, .pdf, .eps (outlined, Please save for
CS3), .ai (outlined, Please save for CS3) - Q. What color mode should my files be?
A. If you send us an RGB file, there is a chance that a color shift may occur and
you may not be satisfied with your job.
These colors are in RGB

These are the same colors but in CMYK

You should always start and finish your designs in CMYK mode - Q. Can I submit multiple files in one document?
A. No. We are specifically set up to process one side at a time, and this requires
that each side of a job must be on a separate file.
Correct: 2 Files-1FR, 1BK Incorrect: 1 File - FR&BK
Not separating files will cause delays and you might have to send the files again. - Preparing Artwork
- Q. What resolution should my file be?
A. 72 dpi files or images may come out low res or pixilated. This may result in a
printed product that you may not be satisfied with. We recommend if you do
use your own artwork, only use 300 dpi files or images.
These are 72 dpi low res images

These are the same images but at 300 dpi

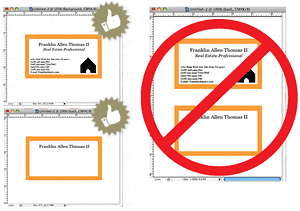
- Q. How should I prepare my artwork?
A. All artwork that is submitted should be built with our certified templates.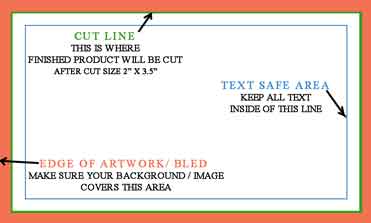 As you can see, our templates show you exactly where your artwork should go. The green line is where the finished product will be cut. All your text and anything you do not want cut should be behind the blue line. Your background image or color should cover up the red area or bleed area. This is used so that your cards background goes to the edge of the card. Remember to always remove the template when you are finished with your design, before uploading.
 - Q. Can I have borders on my artwork?A. Yes. However, if the border is too close to the cutline, it may be cut off-centerslightly.
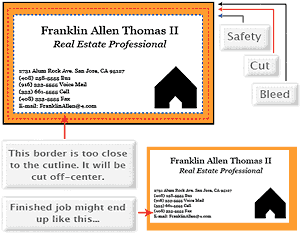 We cut through many sheets at a time, so watch your borders to avoid an unwanted mistake.
LuxFortis not responsible for issues regarding this subject. - Q. How can I avoid transparency issues?A. Any transparency issue can be resolved before saving your file.
 To prevent this, never use shadows, glows, or any other transparency (image or otherwise) on top of a spot color. Always convert your spot color to CMYK and flatten before sending.
 All of these effects will cause transparency problems.
LuxFortis not responsible for issues regarding this subject. - Q. What is overprint, and how can it ruin my file?A. Primarily used to intentionally overlap inks for a number of reasons, overprint can cause unexpected results. We suggest that you turn all overprint objects off before submitting your files.
 In this case the logo was set to overprint. The colors from logo are mixing with the colors from the background. Unexpected results may occur if you have accidentally set certain objects to overprint. Always check logos and other artwork before submitting.LuxFortis not responsible for issues regarding this subject.
 - Q. How can I make sure my blues do not come out purple?A. When using a blue in your design, always make sure to leave at least a 30% difference in your Cyan and Magenta values.
100% C 100% M 0% Y 0% KOn Screen After Printing
 Blue is close to purple in the CMYK spectrum. Remember, use a low amount of magenta whenever using high amounts of cyan to avoid purple.
Example: C-100 M-70 Y-0 K-0LuxFortis not responsible for issues regarding this subject. - Q. How do I get a grayscale image in a CMYK document?A. Grayscale images that are converted to CMYK will have a color shift in the final print. That shift may be green or yellow.
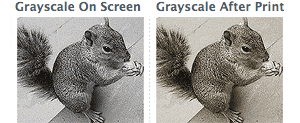 Always check the CMYK values of your grayscale in the final CMYK document. If there are other values other then K in your grayscale image, there is a chance that the color will vary.
To eliminate all values other then K, use your Channel Mixer (adjustment layer) in Photoshop, then click "Monochrome" and adjust accordingly. - Q. What is rich black and how can I get it?A. Rich black is an ink mixture of solid black, 100% K, with additional CMY ink values. This results in a darker tone than black ink alone. If you print black alone as 100% K, the resulting black may not be as dark as you might like.100% K on screen
 100% K after print
 We recommend using
C 60 M 40 Y 40 K 100
This will give you a deep, dark, rich black. - Q. Why does my business card crack around the edges?A. Cracking of the edges of a business card sometimes occurs when the card contains high values of ink, as in dark colors.Close up of business card
 This usually happens on a small amount of cards in the run. To prevent this, use lighter colors or if you must use dark colors, use as little ink as possible.LuxFortis not responsible for issues regarding this subject.
 - Q. What is banding?A. Many things can cause banding. Banding can be caused by the program that it is exported from, such as Indesign or Corel. Also, too many gradient steps, for example going from a very light color to a dark color, in a small area will cause banding.Close up of banding
 To prevent this, check your digital files before sending. If you use a gradient, make sure it has enough room for a smooth transition.LuxFortis not responsible for issues regarding this subject.
 - Setting up a Large Format File
- Q. What is the difference between raster and vector?Raster based artwork such as photos, or flattened artwork (from Adobe Photoshop) are made up of tiny squares (pixels) and depending on your resolution and/or final output size desired, the file could have a low quality end result. Any raster elements you wish to use should have a high enough resolution (DPI) before considering them for your large format product.Vector based artwork such as illustrations or clip-art style elements (from Adobe Illustrator) is made with mathematical calculations, and can be scaled up to any size without losing quality. Keep in mind that any effects used in Adobe Illustrator are raster based and have transparency - this greatly adds to file size and you must have correct settings in your "Document Raster Effects Settings" to ensure best output for these effects. If you`re doing a photo-quality print on a 36" x 48" poster, and leave the raster effects settings at default 72 DPI - you may see tiny squares in your drop shadows, as opposed to a smooth shadow.
- Q. Do you print using any Spot or Pantone colors?A. Yes, we do print in Pantone or Spot color as well as in CMYK
- Q. What size are your Grommets? How far apart do you typically place them?A. We use #2 grommets, they are 3/8" and brass in color. Grommets are placed in all 4 corners, and from there they will be placed every 24" as necessary.
- Q. Do you offer double-hemming on any of your outdoor products?A. We do sew our hems when requested.
- Q. How do I store my banner for later use? Is there any maintenance or cleaning required?A. When you are done displaying your banner - in order to maximize your future usage, you must keep it clean, dry, and in a dry cool place while it is not in use. Your outdoor vinyl banner will probably get pretty dirty from all the elements during it`s time being displayed. The best method of cleaning your outdoor vinyl banner is to lay it flat (if possible) on a clean area, table or floor. It is recommended that you use a mild dishwashing liquid and luke warm water to rinse. Do not use any harsh abrasive or petroleum type cleaners. Clean and dry each side before storing. You must ensure it is completely dry prior to roll up and storage. Any wetness left on the banner will cause mildew and may ruin some of your banner over time.
Once your banner is completely dry - roll it up with the image outward - to avoid any cracking of the printed side. Do not roll your banner super tight or super loose - this will allow for some breathing room while it is stored. Place your banner back in box and store it flat, not vertical. If it is standing up vertically, it may wilt and warp causing wrinkles over time - Q. What resolution or size should I create my artwork to ensure the best output?A. This depends on what the final output size will be, and its viewing distance.
Please reference our Scale & Resolution Example Chart below:
PRINTED SIZE MIN. IMAGE DIMENSIONS IMAGE RESOLUTION 2" x 1.60" 640 x 480 pixels 300 dpi 2" x 2" 600 x 600 pixels 300 dpi 2.67" x 2" 800 x 600 pixels 300 dpi 2" x 3" 400 x 600 pixels 300 dpi 3.41" x 2.56" 1024 x 768 pixels 300 dpi 4.27" x 3.20" 1280 x 960 pixels 300 dpi 4" x 4" 1200 x 1200 pixels 300 dpi 4" x 6" 800 x 600 pixels 300 dpi 5.33" x 4.00" 1600 x 1200 pixels 300 dpi 5" x 7" 1000 x 1400 pixels 300 dpi 8" x 5.33" 2400 x 1600 pixels 300 dpi 8" x 10" 1600 x 2000 pixels 300 dpi 8.5" x 11" 2550 x 3300 pixels 300 dpi